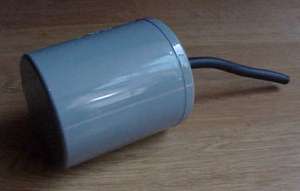
 These things cost $40 each and failed after only 1 1/2 years! The reason why? The retailer sold us the wrong switch for our application....read on! The maufacturer, SJE Rhombus, has sent us 2 replacement float switches of the right kind, free of charge. Thanks for the great customer service, SJE Rhombus!
I was quite distressed in February 2001 when these expensive commercial float switches failed. They are the standard variety found at farm supply stores; They were recommended and sold to us by a retailer who obviously did not know what they were talking about, and have now been bought out by another company.
These things cost $40 each and failed after only 1 1/2 years! The reason why? The retailer sold us the wrong switch for our application....read on! The maufacturer, SJE Rhombus, has sent us 2 replacement float switches of the right kind, free of charge. Thanks for the great customer service, SJE Rhombus!
I was quite distressed in February 2001 when these expensive commercial float switches failed. They are the standard variety found at farm supply stores; They were recommended and sold to us by a retailer who obviously did not know what they were talking about, and have now been bought out by another company.The one on my cistern failed completely, letting the solar pump overfill the tank and flood my root cellar. The one at the spring continued to correctly and turn off the pump when the water level got low (whew...otherwise, if the pump sucked air from the spring instead of water, I'd have to remove all the fiberglass insulation layers, climb down in, and bleed the air from the line). But the switch also started failing to reset itself...so I'd have to hike up the hill to the spring through 3 feet of snow, open the spring house and manually shake the switch to make it reset. What a drag.
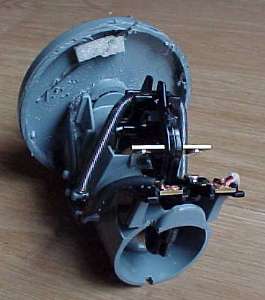
 We cut open a switch to see why it failed
Why they failed (we think)
Everything appears fine with the inner mechanism of the switch. No corrosion was noticed on the contacts. These switches were originally designed to be used for the direct switching of 120 volt AC pump loads. In my application, they are only switching a miniscule amount of power from the pump controller box instead of the whole load. We are guessing that the switch design depends on a tiny 120VAC arc to jump between the contacts every time the switch triggers.
UPDATE 12/03/2003 --why they failed, from the manufacturer-- the float switch manufacturer, SJE Rhombus, has sent us 2 new replacement float switches, free of charge. They found this page on the internet and contacted us out of the blue. Our guess was correct -- the model of float switch we used (the PumpMaster) REQUIRES a 120vac load to arc across the contacts -- that's what keeps the contacts clean. With the controller system I am using, only a tiny amount of DC current is used for the float switches to control the controller/LCB box. This tiny amount of current does not arc, and that caused the switches to malfunction. The replacement switches they are sending us free of charge are called the MicroMaster, and are rated for this application. Thanks again to SJE Rhombus for great customer service.
We cut open a switch to see why it failed
Why they failed (we think)
Everything appears fine with the inner mechanism of the switch. No corrosion was noticed on the contacts. These switches were originally designed to be used for the direct switching of 120 volt AC pump loads. In my application, they are only switching a miniscule amount of power from the pump controller box instead of the whole load. We are guessing that the switch design depends on a tiny 120VAC arc to jump between the contacts every time the switch triggers.
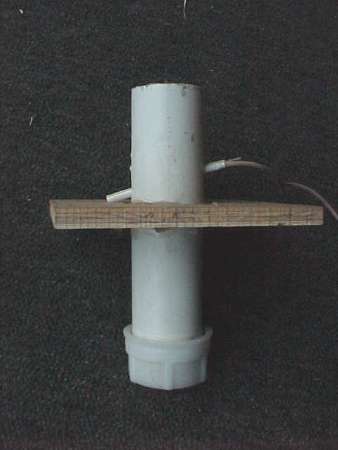
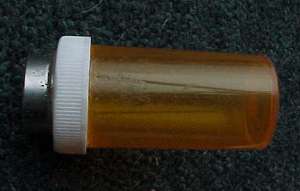
UPDATE 12/03/2003 --why they failed, from the manufacturer-- the float switch manufacturer, SJE Rhombus, has sent us 2 new replacement float switches, free of charge. They found this page on the internet and contacted us out of the blue. Our guess was correct -- the model of float switch we used (the PumpMaster) REQUIRES a 120vac load to arc across the contacts -- that's what keeps the contacts clean. With the controller system I am using, only a tiny amount of DC current is used for the float switches to control the controller/LCB box. This tiny amount of current does not arc, and that caused the switches to malfunction. The replacement switches they are sending us free of charge are called the MicroMaster, and are rated for this application. Thanks again to SJE Rhombus for great customer service.Our Do-It-Yourself Float Switch We decided to try a simple, homebrew version. My home-built version uses a well made of 1 1/2 inch PVC pipe with a cap on one end. Holes are drilled in the end to allow water in, but not let the float drop. The float is just a pill bottle super glued shut with a strong magnet glued to the top. The switch is a glass-encased magnetic reed switch that triggers when it is about 1 inch from the magnet. It is sealed inside a plastic soda straw and inserted through holes drilled in the PVC above the top of the tank (so the switch never touches water). I drilled a series of holes to allow easy calibration of where the switch turns on and back off by moving the reed switch up and down.
 The finished float switch
 Magnetic reed switch
 Float with magnet glued on top
So far the new switch has been very reliable. It took a bit of adjustment to get the magnet to trigger the reed switch without sticking to it and holding the float up when the water level dropped. All in all this was about a 2 hour project, including epoxy drying time. Total cost was ZERO for me, since all the parts were from my junk bin. New, the reed switch would cost less than a dollar, same for the magnet.
Update--- well, after 2.5 years of service the home-built float switch finally failed. We actually received a couple emails from experts predicting that they would fail, and why. They were right! The reason -- after all those cycles, the big neo magnet in the float magnetized the tines of the reed switch. Eventually, after many cycles, the magnet now has to be much closer to the switch to make it trigger at all and shut off the pump. The fix was easy -- I just replaced the reed switch at a cost of about 30 cents! These homemade switches are still a good, cheap way to go -- just be sure to monitor your system and make sure everything is working right so you don't flood your water cistern room!