
| This page is about an older project of ours. We keep ALL of our projects up on the internet for anyone that's interested...but we are no longer pursuing many of these older ideas. Before starting this project, please check our main Wind Power page to check for similar, more recent designs. These will be the top of the list and flagged with an "active project" tag. If you have any questions about what is current and what is not, or why we no longer work on certain designs, first check out our Wind Turbine Evolution page for a detailed history of how our designs have changed over the years. You can also Email us and we'll fill you in as our email volume permits...check the Evolution page first. |
|
PAGE 1 Stator and Magnet Rotors |
PAGE 2 Assembly and Raising |
PAGE 3 Building Matt's 15 foot turbine |
PAGE 4 Blade Carving -- Matt's turbine |
And, be sure to check out our book Homebrew Wind Power for more small wind power information!
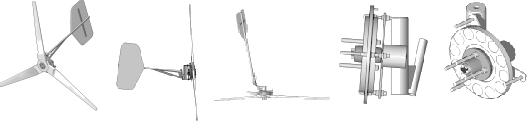
So on Page one we had finished most of the metal cutting and welding, cast the magnet rotors, and finished the stator. Lately I've become fond of the idea of cleaning, priming and painting each part (and greasing the bearing) before it ever goes together in the optimistic hope that it may never have to come apart again for a long time.

In this picture that alternator is finished, and we've fabricated the tail boom.

Here is a picture of the same thing from behind... it's coming out nicely. Again though... were I to do it over again I'd seriously consider a stronger tail pivot! Matt (my brother and the fellow who's going to wind up with this machine) has a standing bet that the tail *won't* be the first 'bits' to fall off this machine, so he's against the idea of strengthening it now. ;-)

Here are my 14' blades on the floor of my shop. They are made from nearly perfect and expensive vertical grain fir, not a knot to be found. The blades are much too large to assemble and get out my door, so I had to assemble them on the floor, mark things out, drill the holes for the studs in one blade at a time, and then assemble them outside.

Here mine is before paint, assembled on a 9' high stand outside.

A bit of stress testing on the blades! It was on the 9' stand and a high wind came through and blew it over! Fortunately no damage was done.

So the next fun part is the tower! I built this tower from pipe, it's 60' tall. Before putting the machine on it we raised it so that we could get all the guy wires adjusted and make sure everything looked solid.

Were assembling the machine on top of the tower. It was a cold snowy day in early Jan! These things seem quite simple when you think about doing them, but when it finally comes time there are many details and it can take all day.

Here it goes up! This tower has a 20' jin pole, and I raise it with a truck. It was a bit tedious... we had 6" of snow and my truck had difficulty with traction once we got it half way up. After about an hour of shoveling snow and throwing dirt under the tires it went up fine.

And here's how it looks today. It took a few tries to get it right, I wound up making two stators and a couple adjustments to the airgap before I was happy with it's performance. At first, it stalled the blades rather badly. This is one reason were going to try slightly larger blades on the next one. After jacking the airgap open to almost an inch... it does very well. It turns in almost no breeze at all, and is cutting in at around 6mph. It does around 200 watts @ 10mph and starts furling at around 22 mph. At 25 mph it's good for about 130 amps into my 12 volt system, so about 1.5KW. It continues to produce good output in higher winds while furling, but it does drop off some. At 40 mph I see about 60 amps and it's very much folded up. It's a lot of current to handle at 12 volts, It inspires me to change over our system to a higher voltage and build a new stator for it. If its very breezy at all, it often produces more power than we can use. I regulate it with the aux relays in my Trace SW 2512 inverter, when battery voltage goes too high it simply turns on a 1200 watt heater and leaves it on for a while to pull them down a bit. So far it's been good... time will tell. If nothing else, it's LOTS OF FUN!!
|
PAGE 1 Stator and Magnet Rotors |
PAGE 2 Assembly and Raising |
PAGE 3 Building Matt's 15 foot turbine |
PAGE 4 Blade Carving -- Matt's turbine |