Some thoughts on Towers

This page contains some thoughts and pictures about towers. The tower is perhaps one of the most important parts of a wind turbine. It can also be well over half the cost of a system overall. Guidelines suggest that a tower should be 30' above anything within a 300' radius in order to keep the turbine up in clean, non-turbulant wind. Air is very fluid (like water) - any obstruction to the wind creates turbulance (like the wake behind a boat). You cant see it, or detect it - but it's hard on a wind turbine and it costs lots of power. Oftain times the best time/money spent on a system is on a nice tall tower.
In practice, we cannot always follow guidelines, we have to work with available resources (time and money). In some places there are few obstructions on the ground, the ground is flat - and an effective tower might be easy. Where we're located (in the Rocky Mountains) we have fairly tall trees - lots of ridgetops.. rocks poking up, unlevel ground - not a lot of money etc, so folks up here take what they can get.
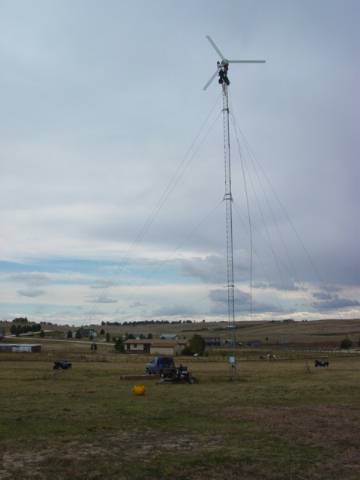
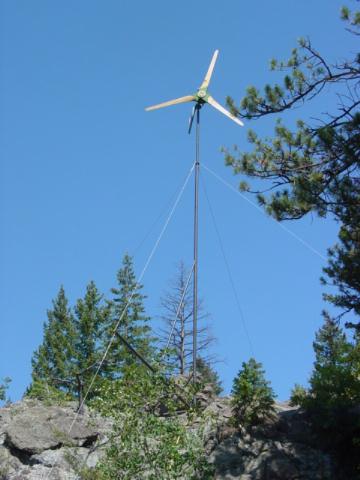
Pictured above is an 80' guyed lattice tower with a 10KW Bergey machine on its top. Scary climbing this sort of thing!
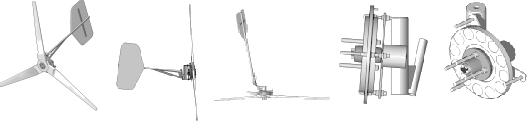
There are a couple common approaches to building towers. Free standing towers require significant foundations, they have no guy wires. They are either lattice towers, or made from pipe/tubing. Their main advantage I think is their appearance, and the very small footprint required. Most very large (utility scale) wind turbines are on free standing towers, they don't seem very commonly used in smaller system probably because of their cost. Guyed lattice towers are common. Usually they are erected with a jin pole or a crane - the same equipment would also be required to install the wind turbine. We have very little experience with these towers. Both types mentioned above require climbing. From here on, we'll discuss simple towers made from pipe that can be tipped up with a winch, or a truck.
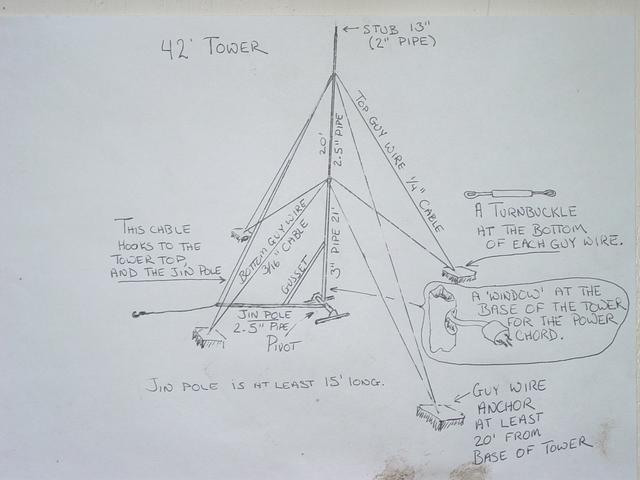
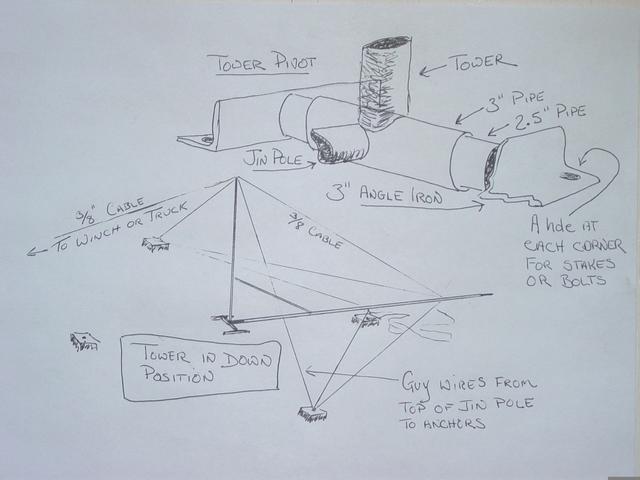
Pictured above is a drawing of a simple 40' pipe tower. Of course many things could be changed, it could be scaled up or down - and there are other ways of doing things. It's typical of several that we've built though and is very workable for a 8 - 10' diameter wind turbine. It's made from Sched 40 steel pipe. Pipe comes in 21' sections, so the tower itself is made from two lengths of pipe. Pipe is measured by its inner diameter. The top section (2.5) dia slips down about 1 foot or so into the bottom section (3" dia). Most wind turbines we build now use 12" of 2.5" pipe for the yaw bearing, so at the top we need a stub of 2" pipe about 13" long for the wind turbine to slip onto.
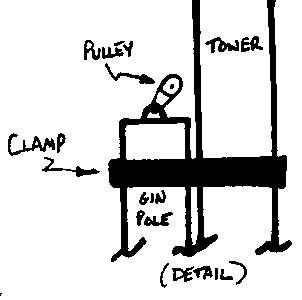
The jin pole is also from 2.5" pipe, as a rule I like the jin pole to be at least 1/3 as long as the tower is high. The longer the jin pole, the easier it is to raise the tower. If its too short, the forces really add up, and it goes up and down too quickly. Longer is better. There is a gusset (2" pipe) in between the tower and the jin pole, it's length is not terribly important - it serves to reinforce the point at which the jin pole is welded to the pivot. 6-8' long would be fine for that gusset, though we've made them both shorter and longer. There also needs to be a heavy cable (3/8" thick) that runs from the tower top to the end of the jiin pole. This cable takes all the force when raising, or lowering the tower.
This tower has 2 sets of guy wires. The side guy wires should be inline with the pivot as they must support the tower while its being raised and lowered. The top set of guy wires should be attached as near the top of the tower as possible such that the blades of the wind turbine cannot hit it. So for a 10' machine, we'd have the top guy wires about 5' from the tower top. The top guy wires take almost all the force from the wind turbine, so they should be heavier than the bottom ones. 1/4" thick steel cable is OK for a 10' wind turbine. I've used lighter stuff, but I wouldn't suggest anybody else try it. The stronger it is.. the longer it will last. The second set of guy wires should be about where the two pipes join - about 22' from the bottom. They serve mostly to keep the tower rigid, they can be lighter stuff. I'd suggest 3/16" cable.
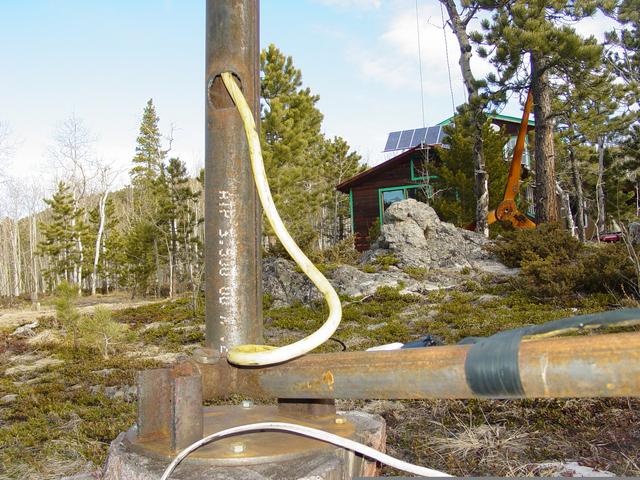
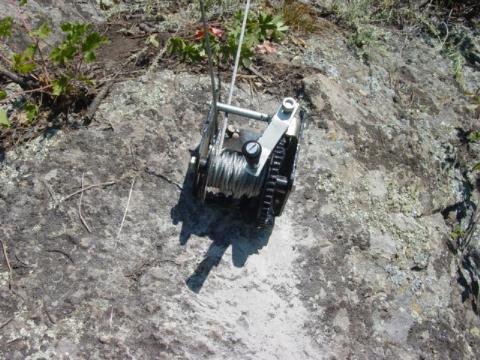
Pictured above is the bottom of my tower. Notice the pivot is made from a simple pipe over pipe arangement. Notice the window in the pipe where the power chord comes out. This allows the machine to pivot easily, and the length of the chord can wind up (or wind down) over time without being a problem. We have a locking plug here so that on occasion we can unplug the maching and allow the chord to unwind if need be. If the site is not turbulant - this is rarely required. With a new installation, it's probably wise to check this frequently to get an idea how oftain it needs attention. I check mine about every 3 months.. it's usually fine.
The drawing above shows some thoughts about how to build a pivot from pipe. The one pictured would be very strong - I've made much lighter duty ones that worked fine. It needs to support the weight of the tower - thats all. The foundation on which the tower/pivot sits is also not a big deal. Much more important are the guy wire anchors. A simple metal 'foot' that can be staked down will suffice for the tower, because all the force is straight down. Main thing is that it cannot slide easily, and that it doesn't sink into the ground. If it sinks it will cause the guy wires to loosen. So, a small concrete pad might be a nice tower foundation, but it's not required.
Also in the picture above is a drawing of the same tower in the 'down' position. You can see how the side guy wires must go up and down with it. Its nice if the guy wires dont loosen - or tighten when the tower goes up and down. In a perfect world, if the ground is perfectly flat and the guy wire anchors are at exactly the same elevation and inline perfectly with the pivot, that would be the case. Otherwise though, it's better if the guy wires tighten as you raise it and loosen a bit when you lower it. That will happen when the guy wire anchors are slightly in front of the pivot (by in front, I mean on the same side of the pivot that the tower tips towards, and opposite from the side where you'd have the winch/truck). It will also happen if the guy wire anchors are at lower elevation than the pivot.
Also shown in the bottom drawing are two 'guy wires' attached to the top of the gin pole. This prevents the jin pole from tipping over. We dont have this on all the towers we've put up, but it's nice insurance. They dont need to be real tight, I dont think turn buckles are required -and once the tower is raised, they can be removed so folks dont trip over them. They are nice to have in place while rasing and lowering though...
Again, like all things - we have to work with what we have. Up here its quite rocky, the ground is almost never level so we work around what we have. My tower has one guy wire much higher than the pivot, one is much lower. My pivot is fairly loose (it has slop to allow the tower to tip some to the side) and when going up or down, it's supported only be 1 of the side guy wires and it leans to the side. Not ideal - but workable. Its very important when raising a tower for the first time to go very slowly, pay close attention the guy wires. If both side guy wires seem to be tight - time to stop, lower the tower again, make adjustments. Once a guy wire gets tight you have no way of knowing how much force is on it, it's quite easy to break one, or tear it out of its anchor.
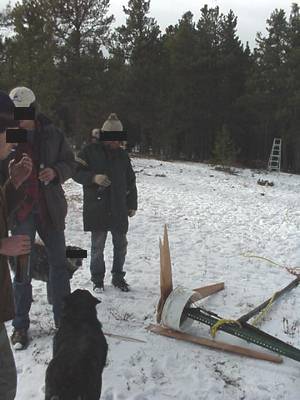
Whenever raising a tower, it's important to double and triple check *everything* before you start. Its important to make sure everyone is out of the 'fall zone'. There could always be surprises and its best to prepare for the worst with these things. Pictured above is Wards tower -first time we ever raised it. We double checked everything, only to find out afterwards that we'd forgot to hook up guy wires on the west side. We also didn't test raise it first, we were confident enough that we put the machine on it. The only thing we did correctly here... was to be sure that nobody (including dogs) was anywhere near the fall zone when we raised it .
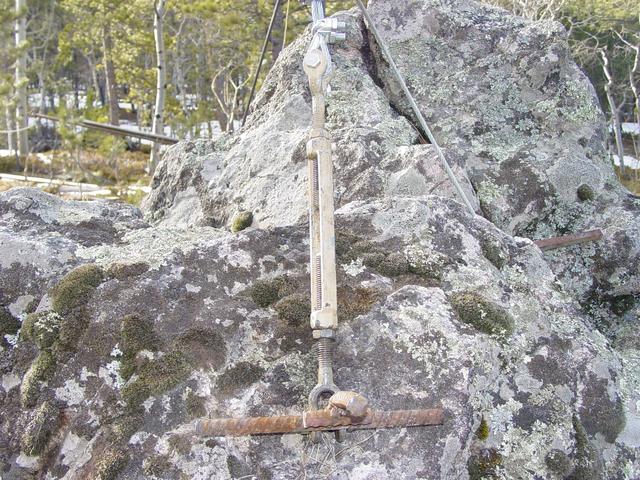
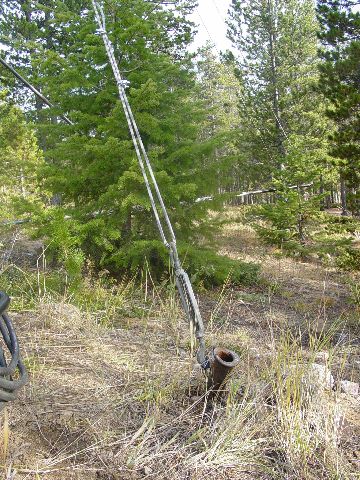
Here is a picture of a guy wire anchor. This is a nice way to anchor into solid rock. We drill a hole (usually 6" deep), and epoxy re-bar into it. Not shown very well here, but - each guy wire is attached to a turn buckle, and inside the loop we have a 'thimble' - which keeps the turnbuckle from wearing into the steel cable. The guy wire is fastened with 3 cable clamps.
Here's a tilt up tower in a rather rocky location. Here, we were able to mount all the guy wires, the pivot, and the winch into solid granit.
This inexpensive worm gear winch works nicely for small towers. You can take off the handle and fit a 1/2" drill to it to speed things up. These imported winches cost $20 - $30. They work nicely, though it wouldn't hurt to have something a bit heavier for the tower described above in the drawings. The one in the picture above is welded to re-bar that's epoxied into the rock.

Pictured above is a tower almost exactly like the one in the drawings. Notice at the end we've welded 'feet' onto it that hold the end of it off the ground. Also notice the pivot - a simple 'H' shape made from pipe that sits on the ground. We staked this one down - it worked fine.

Here is another shot of the same tower that shows the 'foot' a bit better. It's very helpful to have this while working on the machine. Another option is to have a 'stand' on the ground that the tower lands on. Ideally, it should hold the tower up enough so that the blades of the wind turbine can never hit the ground.

Here is a nice pivot on a concrete foundation. This is under a 40' tower.

Concrete makes for a nice guy wire anchor. Here George built a nice form, and cast a re-bar loop into it to hook his turn buckles onto. Another possibility for guy wire anchors is a 'dead man'. Take a log (or something large and heavy) - wrap a chain around it, and bury it. If it's large enough it'll be fine.
At another very rocky site, we built the pivot for the tower between two rocks. It's supported on each side by several pieces of re-bar that are epoxied into the rock.
Tim didn't have rocks handy for guy wires, and simply pounded 4' steaks made from 2" pipe into the ground. Lots of pounding, but they seem quite solid and his 10' machine works fine with it. This may not be such a good option if the soil was loose, or wet. Up here it's dry/rocky and the soil is dense/clay like just a few inches down and it works fine.
Pictured above is a machine assembled on the end of its tower. Before we put the machine on, we need to put lots of grease on the tower stub. I also like to make a sort of 'bushing' that goes between the tower top, and the wind turbine so that the pipe stub does not wear into the top of the wind turbine.
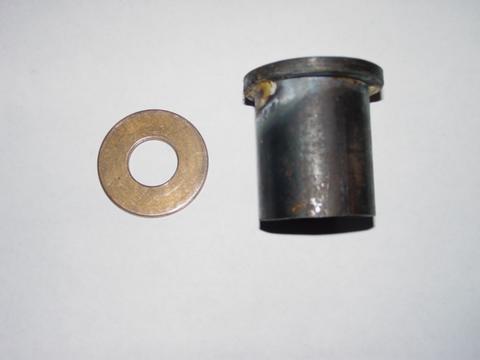
Here is the bushing assembly we make for the tower stub. Basicly its just a cap that slips into the tower a couple inches. There is a large (1") diameter hole in the top. We put that in the tower, then we put the bronze bushing (a thrust bearing, a steel washer, or plastic bushing is also fine) over that. Then we run the wire through all that and put the machine over the top.
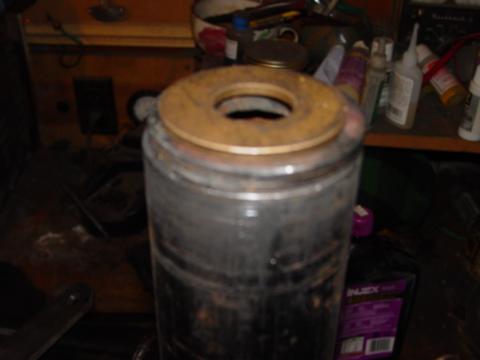
Thats how the same assembly shown above looks when its in the tower top. This is a good, simple/cheap solution. In the past I've put machines right over the pipe stub. They'd work fine usually for about 1 year, then the pipe would be wearing into the top of the wind turbine, sometimes all the way through - but always enough to make them stiff to yaw. This setup prevents that and should hold up for a very long time.
So those are just some thoughts and experiences with towers. Again, it's worth considering the scope of the project before you start. The tower is at least half the project if you're building your own system, and it's best to resign yourself to that fact from the very beginning. It may even be wise for some folks, to build the tower first! Seems like a lot of people build their wind turbines and never get around to the tower part. In my opinion -the tower is the hard work, the wind turbine is the fun part. Up here oftain times we have a bit of a 'tower raising' party - it can go quickly and be lots of fun if you can rope a few freinds and neighbors into it.
Below is our older page on towers, with a link to the Spanish translation. Still a good read, and still valid information.
| This page is about an older project of ours. We keep ALL of our projects up on the internet for anyone that's interested...but we are no longer pursuing many of these older ideas. Before starting this project, please check our main Wind Power page to check for similar, more recent designs. These will be the top of the list and flagged with an "active project" tag. If you have any questions about what is current and what is not, or why we no longer work on certain designs, first check out our Wind Turbine Evolution page for a detailed history of how our designs have changed over the years. You can also Email us and we'll fill you in as our email volume permits...check the Evolution page first. |
Tilt-Up Towers
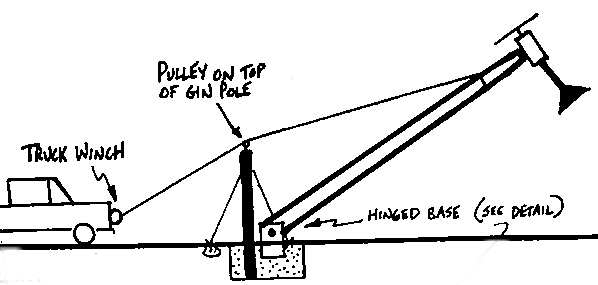
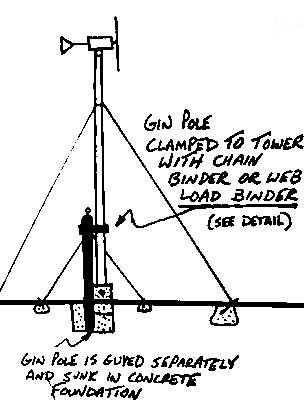
We are very fond of tilt-up towers around Otherpower.com headquarters. One of our Dans is deathly afraid of heights, and the other Dan feels that climbing a 60 foot tower is neither fun nor conducive to a long and healthy life. Therefore, this page will concentrate entirely on the tilt-up variety. This way, all work with tools and heavy wind generators can be done while safely standing on solid ground. Tilt-up towers can be made from wooden utility poles, steel lattice radio towers, or 21-foot sections of steel pipe coupled together. The key features of these towers are 4 guy wires, a hinged base and a gin pole for leverage. To raise a tower, the 2 side guy wires are attached and tightened while the tower is laying on the ground to prevent lateral movement during the process, and the guy wire opposite the winch side is cut to the correct length and attached to the earth anchor to prevent the tower from falling over if it passes plumb. A winch or vehicle is attached to the remaining free side over a gin pole for leverage, and the tower is slowly pulled up. When it is plumbed with the turnbuckles, all guy wires are tightened. To lower it, simply reverse the process. This whole procedure is rather exciting, but not as exciting (terrifying) as climbing 60 feet in the air! The diagrams below show some simple plans for a basic tilt-up tower design.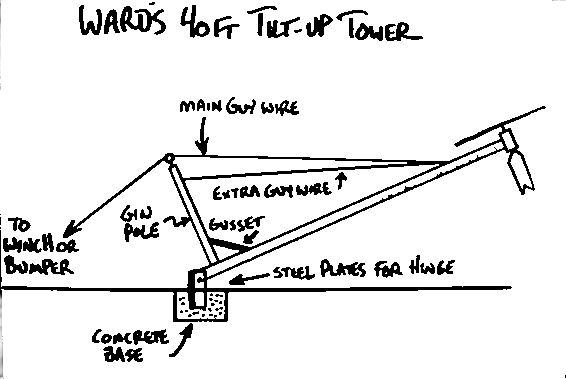
Tower Materials
- Wood--Wooden poles can be very effective and economical. Some of our neighbors have simply used a tall tree from the forest, bored a 1 inch hole near the bottom for the hinge, built a metal collar on which to mount the wind machine, and gone right ahead with the project. None of these towers has yet failed, but the heights average only 20-30 feet. I would be leery of this method with a higher tower! A straight, treated utility pole would make for a much more permanent tower. These are fairly easy to find in 20-30 foot lengths, and can be found (with difficulty) in more useful 50-60 foot sizes too. Topping, limbing and guying a tree has been suggested to us, but we don't recommend that either--trees will eventually rot, they are hard to climb, and sway too much in the wind.
- Metal Pipe--This is my personal favorite. I've had great success using 2 inch galvanized steel water pipe for towers. The maximum recommended height for a 2 inch water pipe tower is 42 feet, which is 2 pieces of pipe. Attach another set of guy wires at the coupling between the two pipes. Also, it would be wise to make couplers between each section that extend into the pipe on both sides for added strength.
- Steel Lattice--These towers are very strong and lightweight, but expensive if purchased new. Used lattice towers can sometimes be found in rural areas, or through ham radio enthusiasts. Though generally not designed for tilt-up use, the base can be modified to be hinged. Contact Lake Michigan Wind and Sun to learn more about this conversion, and for prices and availability of used and new towers. You'll be pleasantly surprised at how little lattice towers weigh--a typical 10 foot section weighs less than 80 pounds!
Foundations
A wind generator foundation must be very strong, especially the hinge. If your tilt-up tower, foundation, or hinge is not strong enough, you will probably find out during the erection process when the entire mess comes crashing to the ground! That is the only time when there is a great deal of sideways stress on the base--during raising and lowering. Pouring a concrete foundation that extends down below frost line is highly recommended. I have successfully used 1/4 inch steel hinge brackets embedded directly in the concrete. 1/2 inch steel plate would be better. See the diagram below for details.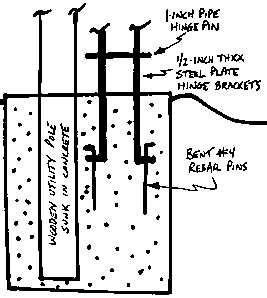
Earth Anchors
Your earth anchors for the guy wires must also be very strong--they have to resist the lateral thrust that is put on the windmill. As your propellor rpm increases, the blades act more and more like a solid sheet of plywood sitting up in the wind. There are a number of different earth anchors that can be used; a rugged mountain installation in the rocks might require a couple of different kinds. Generally, anchors are designed to utilize the weight and shear strength of the surrounding soil to help hold them in place. The radius of your guy wires should be between 50 and 75 percent of the tower height. It is very important to lay out your 4 anchor foundations perfectly perpendicular to each other around the tower foundation--otherwise, the 2 side guys will not stay tight while raising and lowering the tower. Leveling is a an issue too. If the guy wire pads are at different elevations, you will run into the same problems with loose and tight guy wires. Use the highest quality turnbuckles that you can find. Try to find turnbuckles that have removable bolts at each end to hold the guy wire in. Use the thimbles that come with your cable clamps to avoid fraying the cable. Avoid turnbuckles that have hook ends--if you can't find them with bolts or solid loops, be SURE to using baling wire on each hook so nothing pulls loose during raising or lowering. We recently learned a good lesson about guy wires--fortunately it was not a hard lesson! When fastening your guy wires with Crosby U-shaped cable clamps (see photo), make sure to use enough clamps on each connection (3 is recommended), orient them correctly, and tighten them VERY hard! The clamps should all be oriented the same way, with the forged saddle on the live end of the cable. Remember the saying..."Never saddle a dead horse..." don't ever put the saddle of the clamp on the dead end of the cable!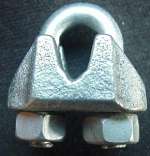 Fortunately we learned this lesson while building a washtub bass for our bluegrass band, and NOT while erecting the windmill! Had we not learned this from building the bass, we would not have oriented the clamps correctly or tightened them enough. We used a length of 3/32 inch aircraft cable for the string, and fastened it at the peghead and at the washtub with cable clamps. But every time we tightened the string enough to play in the key of G, the cable clamps slipped. After about 4 tightenings and the addition of more cable clamps, success was achieved. But it was sure better to find out about these clamps on a bass instead of a windmill! Click HERE for more information about our washtub bass...it's a great instrument that's easy to play with no musical knowledge--all you need is a good ear and strong arms and legs. It's also a bit of an aerobic workout to play, as you raise and lower the pitch of the single string by pull and pushing on the neck while bracing the tub with your foot. And sorry for the diversion....back to the topic now!
- Concrete--This is the all-around strongest solution. The hole for the concrete should be bell-shaped, so it is wider at the bottom than at the top--this allows the soil over the anchor to help hold it in place (see diagram below). A metal loop for the guy wire can be embedded directly in the concrete, preferably at close to a 90° angle from the attachment point near the tower top. Your footing should extend down below frost line. If you set an auger with a plate into concrete, the end should point toward the tower...In other words it should be parallel to the guy wire.
- Augers--If your soil has good shear strength (i.e. it is not loose, dry and crumbly) you can purchase earth augers to anchor your guy wires. These metal rods have an angled plate at the end that allows you to screw it into the ground. Again, they should be angled into the ground so that they are parallel with the guy wire.
- Rock Anchors--We have successfully (so far!) anchored guy wires directly into large rock outcroppings using a homemade 'piton' made of rebar. Drill a 3/4 inch hole in the rock with a hammer drill, again angled away from the windmill. Pound in a #6 rebar and weld a loop for the guy wire on the end. Epoxy in the hole might also help. Our first version used #4 rebar and seems very strong, but a larger diameter would be better.
- Fence Posts--Metal T posts can make fast and easy earth anchors for 20 to 30 foot towers if you can pound them in deep enough. If not, we have successfuly dug out around the post and poured in concrete for a very strong anchor on a 30 foot metal pipe tower. With fence posts, they should be angled into the ground at 90 degrees to the guy wire.
Vibration
Windmill towers are subject to all sorts of vibration. The propellor, changing wind direction, generator noise, and effects of the wind directly on the tower can cause all sorts of harmonic vibration, some audible and some not. Be sure to Loc-tite® all bolts on the tower. If harmonics are causing problems (such as a swaying metal pipe tower), the problem can sometimes be fixed by changing where the guy wires attach to the tower, or by adding extra guy wires farther down the tower.Field Expedient Windmill Tower
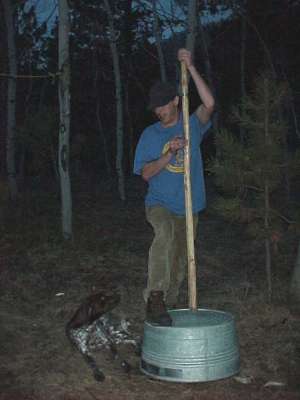
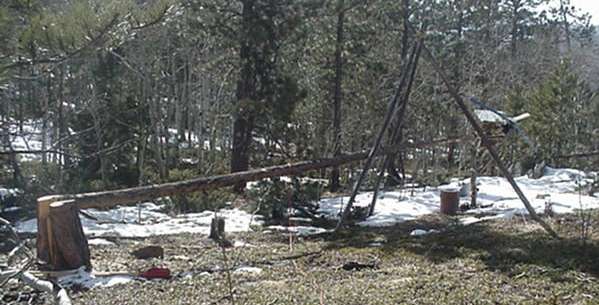
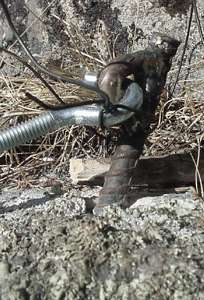
One of our Dans was running into some serious power problems...his batteries (inherited from the previous owner of the house) were trashed, and the new Starband satellite uplink through which we run our website draws about 300 watts. He needed more power, and fast! He didn't have time to build a proper tower, and the ground was frozen solid, eliminating any possibility of digging or pouring concrete for a foundation or guy anchors. Pictured is the result--Dan cut down a live tree, and carved the stump into a hinged base. The tower is a lodgepole pine that was standing dead, and the hinge pin is one inch pipe with another smaller pipe inside it. Two of the guy wires are anchored into rock with pitons made of 1/2 inch rebar, the others are guyed directly to the bases of live trees (he tried metal fence posts, but the ground was too rocky and frozen to pound them in). This tower is intended as a temporary measure; the windmill involved is one of our homebuilt models made with minimal monetary investment, so it's not a great loss if the tower fails--we'll chalk it up to a learning experience! Hinged base made from tree stump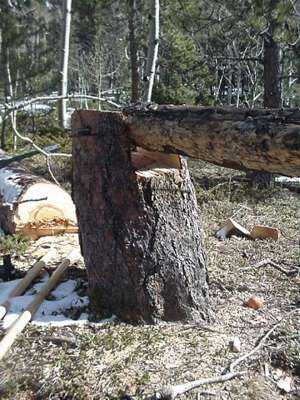
 Improvised guy anchor piton
 We would like to include more home made tower designs on this page. If you have built a windmill tower from scratch and are willing to share your experiences and photos, please email us!