Homebrew 10' Wind Turbine, STATOR MOLD
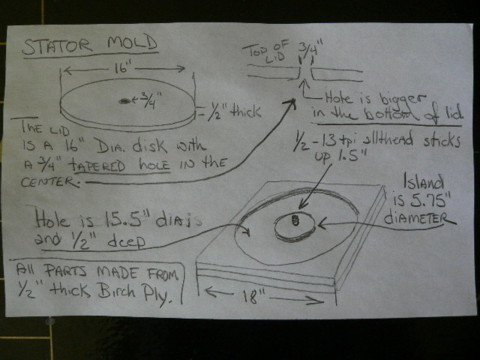
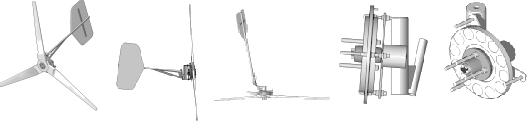
The stator consists of 9 coils equally spaced around a circle, wired in 3 phase star configuration. Once you finish winding and connecting our coils you'll need to cast them in resin to form the stator. The stator is a disk 15.5" diameter with a hole in the middle 5.75" in diameter. To make this we need to build a mold out of plywood. This chapter will show exactly how we built ours. Of course many things could be changed and it would still work fine (or maybe even better). We call for all 1/2" thick birch plywood (birch plywood is stronger and smoother) for all the parts. You could use thicker stuff for the lid and the base, but the middle must be 1/2" thick - the stator has to be 1/2" thick when we're finished.
Materials
- 18" square birch plywood 1/2" thick, qty 2
- 16" diameter birch plywood disk, 1/2" thick
- 5.75" birch plywood disk, 1/2" thick
- 1/2" - 13 tpi threaded rod 2.5" long
- 1/2 - 13 tpi nut
- 1/2" washer
- 13 3/4" long wood screws
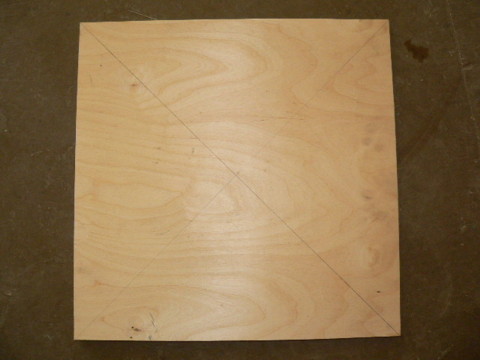
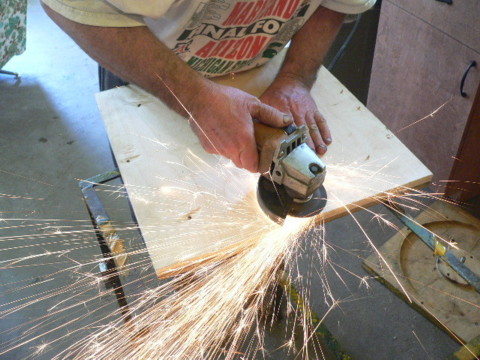
Start by cutting out an 18" square piece of plywood. This will be the bottom of the mold
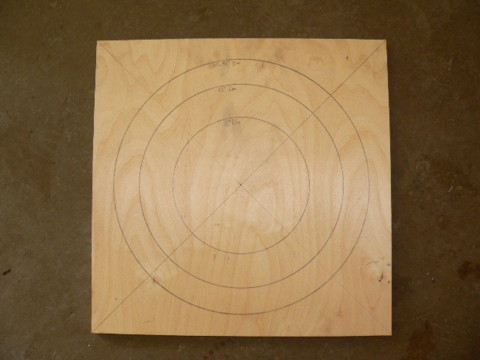
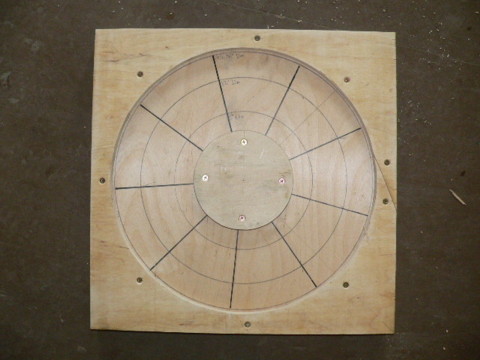
Find the center of the square. (an easy way is to draw light lines from corner to corner - where they intersect is center). Use a compass to draw 3 circles on the bottom of the mold. One should be 8" diameter, one 12" diameter, and one 15.5" diameter. The space between the 8" dia and the 12" dia circles is the area that the magnets will rotate over and the coils will need to be centered over these lines. The 15.5 diameter circle shows the outside diameter of the stator and this will help to make sure the middle section of the mold is centered perfectly.
There will be 9 coils and it's nice to draw lines in the mold so that we know the maximum permissable size of each coil. It will also help to be sure that the coils are spaced around the circle properly. In order to divide the circle into 9 equal spaces you need to know the length of one side of the circle. We worked from the 12" diameter circle we drew. An easy way is to use the table of Sides, Angles and Sines. Multiply the sine of the angle (20 deg for 9 sides) times the diameter of the circle you wish to divide (12"). The sine of 20 deg (.342) * 12 = 4.104" per side.
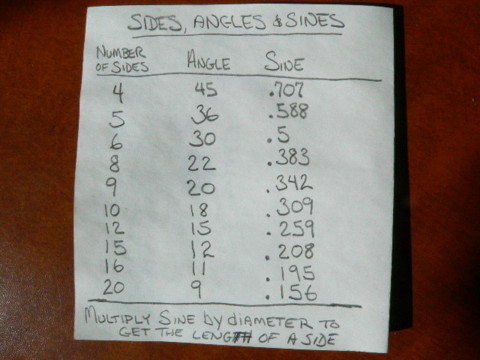
The table of sides, angles and sines for the most common numbers we use in these alternators. The angle given is half the actual angle of any segment. To use the table, pick the number of segments (sides) you need to divide the circle into. Multiply the Sine by the diameter of the circle. Set the compass to that length. Pick a starting point and make marks with the compass about half way around the circle. Then go back to the starting point and work in teh opposite direction. This will lessen any error that might come up from imperfect measuring or rounding of numbers, but hopefully you'll come out very close!
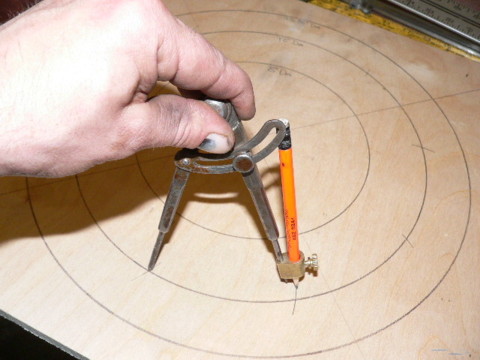
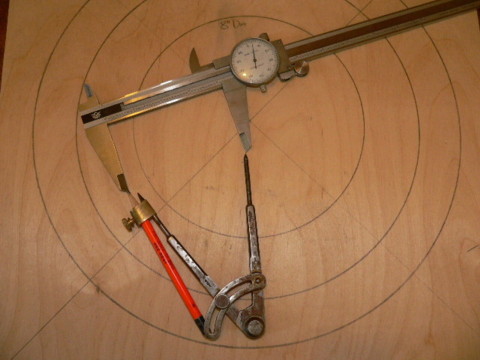
Use dial calipers to adjust your compass as shown in the picture. Then pick a starting point on the 12" circle and use the compass to divide the circle into 9 equal parts. This is a nice way to divide any circle - it's very handy for placing magnets and coils accurately in different sized wind turbines.
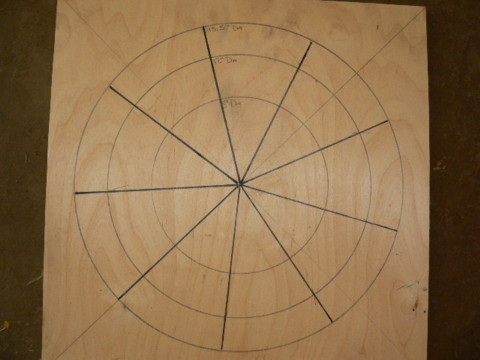
Draw lines from the center to the 15.5" diameter circle to show the space that each coil should occupy.
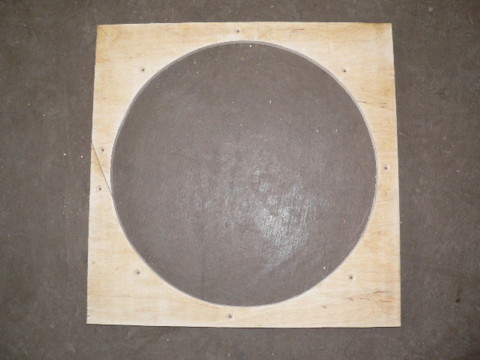
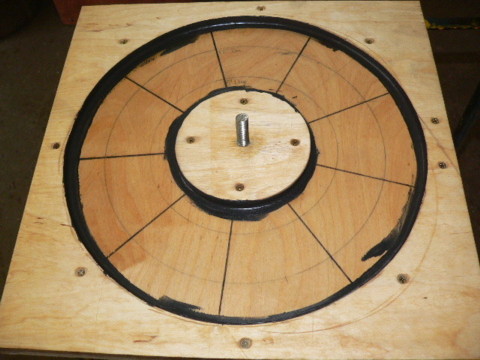
Make another plywood square just like the last one (18" square) and cutout a hole in the center 15.5" in diameter. This is the middle of the mold. Sand the cuts on the inside smooth and try to give it a very slight taper (so that the top is just slightly larger diameter than the bottom). This will make removing the casting easy. Drill holes ( 3/16" diameter for wood screws) around the circle (keep them about 1/2" away from the inside edge). If your's is like the one in the picture, you'll need at at least 9 screws to hold this piece down flat against the bottom of the mold. Run a countersink into the holes deep enough to be sure that all the screws will be flush with (or below) the surface of the mold.
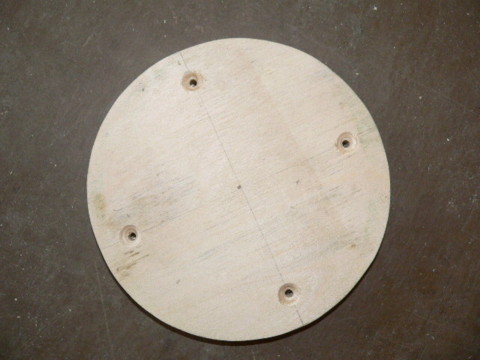
Cut out another disk 5.75" in diameter. This will be the island in the center of the mold. It also needs to be sanded smooth and slightly tapered. Drill 4 holes for wood screws as shown in the picture and run the countersink in just like you did for the middle part of the mold.
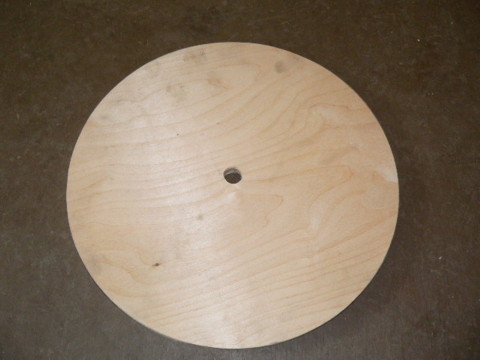
Cut out another disk from birch plywood, 16" diameter. This is the lid for the mold. Sand the edges smooth. Drill a 3/4" diameter hole in the center and give it a slight taper with a round file. (sand paper wrapped around a wooden dowel or bolt works nicely too)
Center the pieces of the mold up and screw them together with 3/4" long wood screws.
If the screws come all the way through the mold, grid the sharp tips off so nobody gets hurt by them.
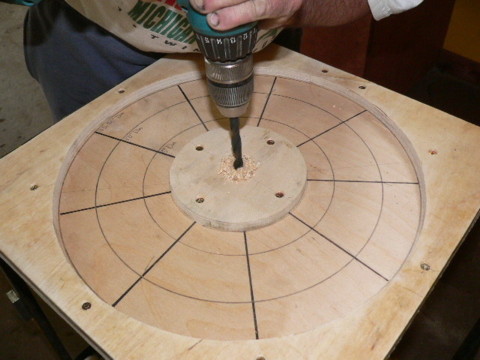
Drill a 7/16" diameter hole all the way through the center of the mold. We'll be tapping this hole for the threaded rod - since it's wood you could use a smaller drill bit, the tap will cut wood easily.
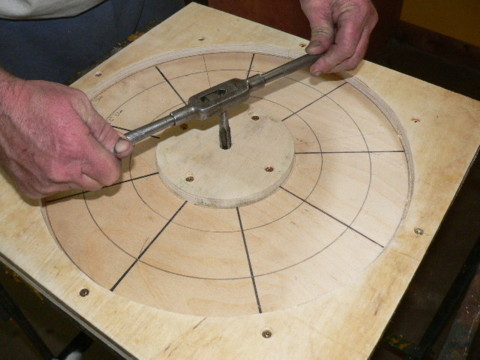
Tap the hole 1/2" - 13 tpi.

Put a bit of epoxy on the threads of the threaded rod. You may need to double nut the end of the threaded rod but usually you can screw it in by hand. Screw the threaded rod into the hole so that the bottom of the rod comes flush with the bottom of the mold. If any epoxy comes up to the top of the mold wipe it off with a rag.
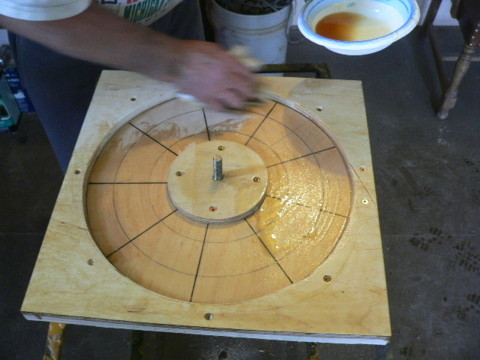
Wipe the mold down with boiled linseed oil. This will help fill the pours in the wood. When we grease the mold before casting, this assures that the grease will not soak into the mold and the castings will come out more easily. It also protects the mold from water.
Once the linseed oil is dry run a bead of caulk around the edges of the inside of the mold. This will help create a 'tapered' mold, it will also plug any cracks between pieces of plywood to help assure the castings come out easily.
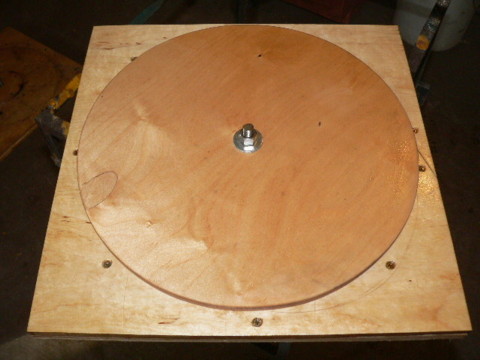
Put the lid on the mold, and hold it there with a 1/2" washer and a nut (the nut will be used to help clamp the lid down when were casting). Put it aside untill you get around to building the stator!
Click Here to return to the front page of this project.
Homebrew Wind Power by Dan Bartmann and Dan Fink.The best book out there about building and flying do-it-yourself wind turbines. We know, because we wrote it! Order it from our Online Store HERE. |
This page is one of a series that were the nucleus for our new book, Homebrew Wind Power.Everything here is pretty much correct, and you can build a successful, reliable and quiet 10 foot diameter wind turbine from the free information on these pages. But--please note that as of January 1, 2009 we are no longer updating these free plans here! We have made numerous postings on our Discussion Board about things we do differently from this wind turbine design now, and our book Homebrew Wind Power goes into much more detail about all aspects of building wind turbines from scratch, including revisions to this page. The new blog for our book, HomebrewWind.com, is where you'll find our latest updates, thoughts, corrections of errors in the book, rants, raves, CAD drawings, videos, and random bits about building wind turbines. |
The stator consists of 9 coils equally spaced around a circle, wired in 3 phase star configuration. Once you finish winding and connecting our coils you'll need to cast them in resin to form the stator. The stator is a disk 15.5" diameter with a hole in the middle 5.75" in diameter. To make this we need to build a mold out of plywood. This chapter will show exactly how we built ours. Of course many things could be changed and it would still work fine (or maybe even better). We call for all 1/2" thick birch plywood (birch plywood is stronger and smoother) for all the parts. You could use thicker stuff for the lid and the base, but the middle must be 1/2" thick - the stator has to be 1/2" thick when we're finished.
Materials
- 18" square birch plywood 1/2" thick, qty 2
- 16" diameter birch plywood disk, 1/2" thick
- 5.75" birch plywood disk, 1/2" thick
- 1/2" - 13 tpi threaded rod 2.5" long
- 1/2 - 13 tpi nut
- 1/2" washer
- 13 3/4" long wood screws
Start by cutting out an 18" square piece of plywood. This will be the bottom of the mold
Find the center of the square. (an easy way is to draw light lines from corner to corner - where they intersect is center). Use a compass to draw 3 circles on the bottom of the mold. One should be 8" diameter, one 12" diameter, and one 15.5" diameter. The space between the 8" dia and the 12" dia circles is the area that the magnets will rotate over and the coils will need to be centered over these lines. The 15.5 diameter circle shows the outside diameter of the stator and this will help to make sure the middle section of the mold is centered perfectly.
There will be 9 coils and it's nice to draw lines in the mold so that we know the maximum permissable size of each coil. It will also help to be sure that the coils are spaced around the circle properly. In order to divide the circle into 9 equal spaces you need to know the length of one side of the circle. We worked from the 12" diameter circle we drew. An easy way is to use the table of Sides, Angles and Sines. Multiply the sine of the angle (20 deg for 9 sides) times the diameter of the circle you wish to divide (12"). The sine of 20 deg (.342) * 12 = 4.104" per side.
The table of sides, angles and sines for the most common numbers we use in these alternators. The angle given is half the actual angle of any segment. To use the table, pick the number of segments (sides) you need to divide the circle into. Multiply the Sine by the diameter of the circle. Set the compass to that length. Pick a starting point and make marks with the compass about half way around the circle. Then go back to the starting point and work in teh opposite direction. This will lessen any error that might come up from imperfect measuring or rounding of numbers, but hopefully you'll come out very close!
Use dial calipers to adjust your compass as shown in the picture. Then pick a starting point on the 12" circle and use the compass to divide the circle into 9 equal parts. This is a nice way to divide any circle - it's very handy for placing magnets and coils accurately in different sized wind turbines.
Draw lines from the center to the 15.5" diameter circle to show the space that each coil should occupy.
Make another plywood square just like the last one (18" square) and cutout a hole in the center 15.5" in diameter. This is the middle of the mold. Sand the cuts on the inside smooth and try to give it a very slight taper (so that the top is just slightly larger diameter than the bottom). This will make removing the casting easy. Drill holes ( 3/16" diameter for wood screws) around the circle (keep them about 1/2" away from the inside edge). If your's is like the one in the picture, you'll need at at least 9 screws to hold this piece down flat against the bottom of the mold. Run a countersink into the holes deep enough to be sure that all the screws will be flush with (or below) the surface of the mold.
Cut out another disk 5.75" in diameter. This will be the island in the center of the mold. It also needs to be sanded smooth and slightly tapered. Drill 4 holes for wood screws as shown in the picture and run the countersink in just like you did for the middle part of the mold.
Cut out another disk from birch plywood, 16" diameter. This is the lid for the mold. Sand the edges smooth. Drill a 3/4" diameter hole in the center and give it a slight taper with a round file. (sand paper wrapped around a wooden dowel or bolt works nicely too)
Center the pieces of the mold up and screw them together with 3/4" long wood screws.
If the screws come all the way through the mold, grid the sharp tips off so nobody gets hurt by them.
Drill a 7/16" diameter hole all the way through the center of the mold. We'll be tapping this hole for the threaded rod - since it's wood you could use a smaller drill bit, the tap will cut wood easily.
Tap the hole 1/2" - 13 tpi.
Put a bit of epoxy on the threads of the threaded rod. You may need to double nut the end of the threaded rod but usually you can screw it in by hand. Screw the threaded rod into the hole so that the bottom of the rod comes flush with the bottom of the mold. If any epoxy comes up to the top of the mold wipe it off with a rag.
Wipe the mold down with boiled linseed oil. This will help fill the pours in the wood. When we grease the mold before casting, this assures that the grease will not soak into the mold and the castings will come out more easily. It also protects the mold from water.
Once the linseed oil is dry run a bead of caulk around the edges of the inside of the mold. This will help create a 'tapered' mold, it will also plug any cracks between pieces of plywood to help assure the castings come out easily.
Put the lid on the mold, and hold it there with a 1/2" washer and a nut (the nut will be used to help clamp the lid down when were casting). Put it aside untill you get around to building the stator!
Click Here to return to the front page of this project.