10 foot Wind Turbine construction, Carving the blades
Carving the Blades
The blades are perhaps the most important part of our wind turbine - they are the ‘engine’ that drives our generator. These wind turbine blades have a simple airfoil and when finished they’ll look (and work) a bit like airplane wings. This design is a simple one. It’s a compromise we made keeping the following things in mind: efficiency, strength, cost and availability of materials, and ease of construction.Before you start a few terms should be defined. The 'tip' of the blade is the end that's at the very outer diameter - farthest away from the alternator. The ‘front’ of the blade is the surface that faces towards the wind, it’s flat and angled a bit. The ‘back’ of the blade is facing away from the wind and it’s rounded in shape. The ‘Root’ is the inside of the blade, closest to the hub and the alternator. The ‘Leading Edge’ is the edge of the blade that gets there first (if it were an airplane wing then the leading edge is the front of the wing). The ‘trailing edge’ is the edge is the edge of the blade that gets there last (if it were an airplane wing it would be the back edge of the wing). The ‘Pitch’ of the blade is the angle between the surface of the front of the blade, and the plane of the blade’s rotation. It changes over the length of the blade. The Chord of the blade is the width (the distance between the leading edge and the trailing edge) and it gets less (the blade gets narrower) as the diameter gets larger. The thickness of the blade is the thickness at the ‘fattest’ point in the airfoil.
The simplest material to build your blades from is common
pine, or fir 2 x 8 lumber. Typically a planed 2 x 8 is 7.5 inches wide
and 1.5” thick, so the plan is based upon that. Pine and fir have good
strength to weight characteristics. Very hard, or very soft woods
should be avoided. The very best choice is probably clear (knot free)
Sitka Spruce, but it’s expensive and hard to find. Most lumber yards
have perfectly acceptable material. Generally you should use conifers
although the very lightest ones might be too weak. I would avoid
Redwood. The wood should be dry and as knot free as possible. Often
times we build ours from laminated Red Western Cedar 2 x4’s, but that
adds an extra step and it’s not necessary - but it does make for a
strong, lightweight blade. Whatever you find, you need 3 boards about
7.5 inches wide, 1.5 inches thick and 60 inches (5 feet) long.
There are a variety of tools you could use. A draw knife is almost a must have. Chisels, hammers, sand paper, planes and other wood working/carving tools are handy. Some of the work at the beginning of the project involves removing large pieces of the board and a band saw is very useful - but not necessary. A hand held power planer is nice but hand planes work almost as well and they’re much quieter and more peaceful to work with. This whole project can be done fairly easily with hand tools only.
The instructions will describe how to carve a single blade. You need to make three of them. We suggest you make all three at one time rather than making one at a time. There are several operations involved, it’s better to do one operation to each blade and work them all along together, they’ll come out more alike that way. If you perform an operation on one blade… do it to the other two before you move along to the next step.
Find a some lumber!

(For all the CAD images on this page right click on them, and select 'veiw image' to see the full sized drawing)
Start with three 2 x 8 boards, 7.5 inches wide, 1.5 inches thick and 60 inches (5 feet) long. Hopefully its free (or mostly free of knots). Try to pick lumber with nice straight grain, the more vertical the better.
Cut out the shape of the blades
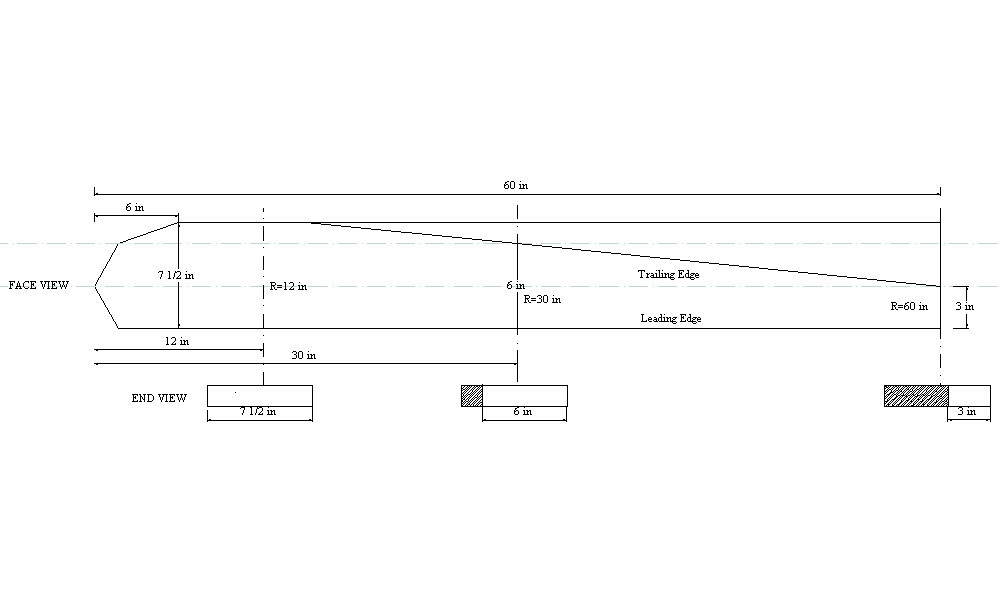
Pictured above is the shape of the blades. You can see how the blade is tapered. At the tip (radius = 60 inches) its 3 inches wide. At the half way point (Radius = 30 inches) it’s 6 inches wide. Draw a line between those two points and extend it to where it meets the edge of the board (this will be somewhere around radius 14 inches but it can vary depending on the width of your lumber) . You can either make a template and trace it onto all three blades, or just lay it out on one blade and cut out the profile, then trace it to the other three. Cut out the blades with a band saw, circular saw or whatever you happen to have available.

Pictured above is detail of the root of the blade. This drawing will help you with the layout. You need a 120 deg angle at the root so all three blades fit together tightly. Lay this out on all three blades and cut them out.
Taper the thickness of the blade

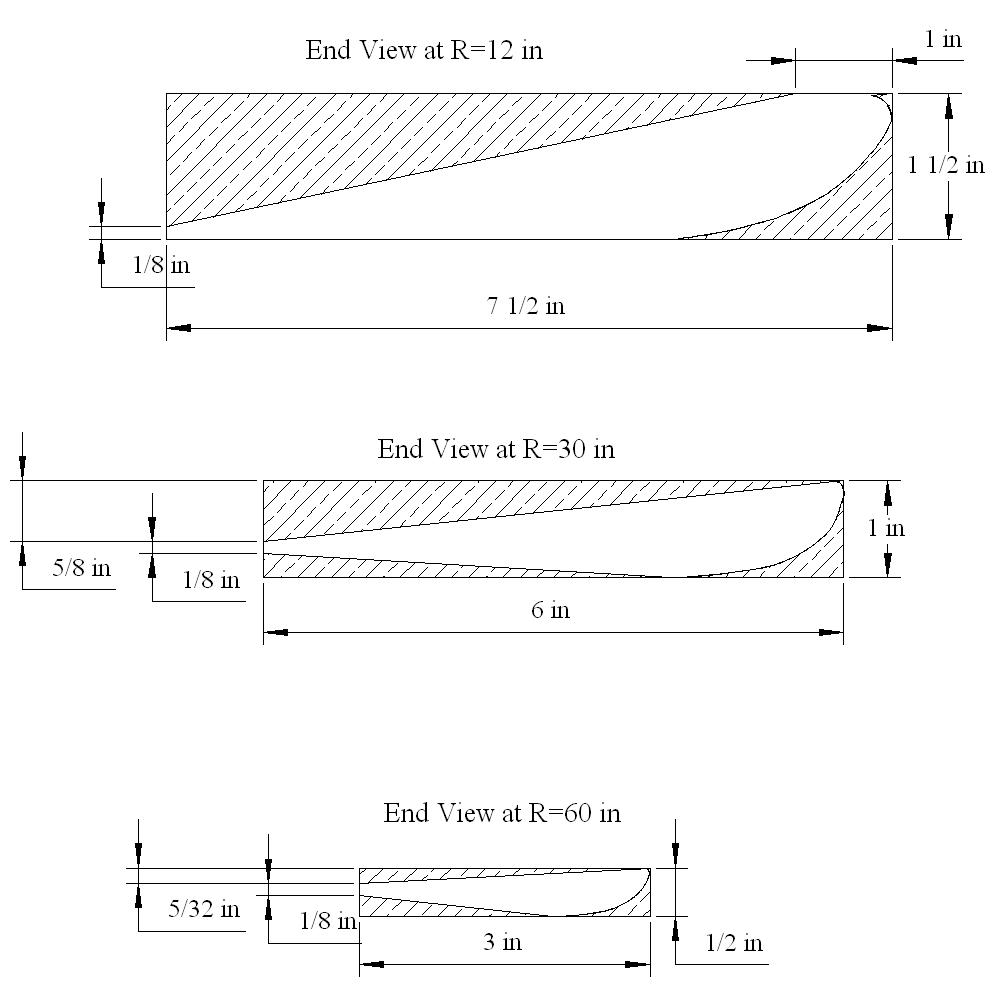
As the blade gets narrower towards the tip it also gets thinner. The picture above shows how to taper the thickness of the board. The top of the image is the front of the blade and you don’t taper that part. All the material is removed from the bottom of the blade. The edge view is looking at the board from the leading edge, the ’end’ view shows the cross section of the blade (white) and the scrap (darkened) at the tip, R= 30 inches and R= 12 inches. It’s better to be too thick than too thin at this point - be sure not to get things too thin or the blade will be weakened. The dimensions we give for thickness in the drawing are the absolute minimum.
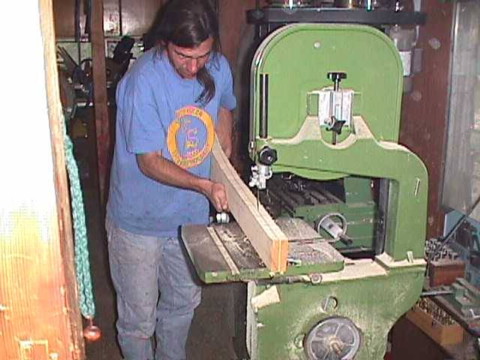
Getting the board thickness right with a band saw
A band saw is probably the best tool for cutting the board thickness. Give yourself room for slop - don’t crowd the line. When cutting this with a band saw its possible the board will not be perfectly square with the table and it’s easy to get different thickness on one side than the other so give yourself room! The band saw is useful for removing most of the scrap. After that it’s best to finish the job with a hand plane or a power planer.
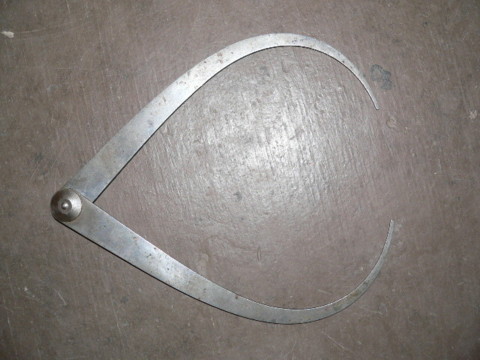
Calipers work well for making sure you’ve got the thickness right throughout the length and width of the blade. If you don’t have a band saw the whole job can be done with a plane or planer (or even a draw knife) - it just takes longer and makes more mess. When finished the back of the blade should be smooth, and square with the sides.
Carve the pitch on the front of the blade
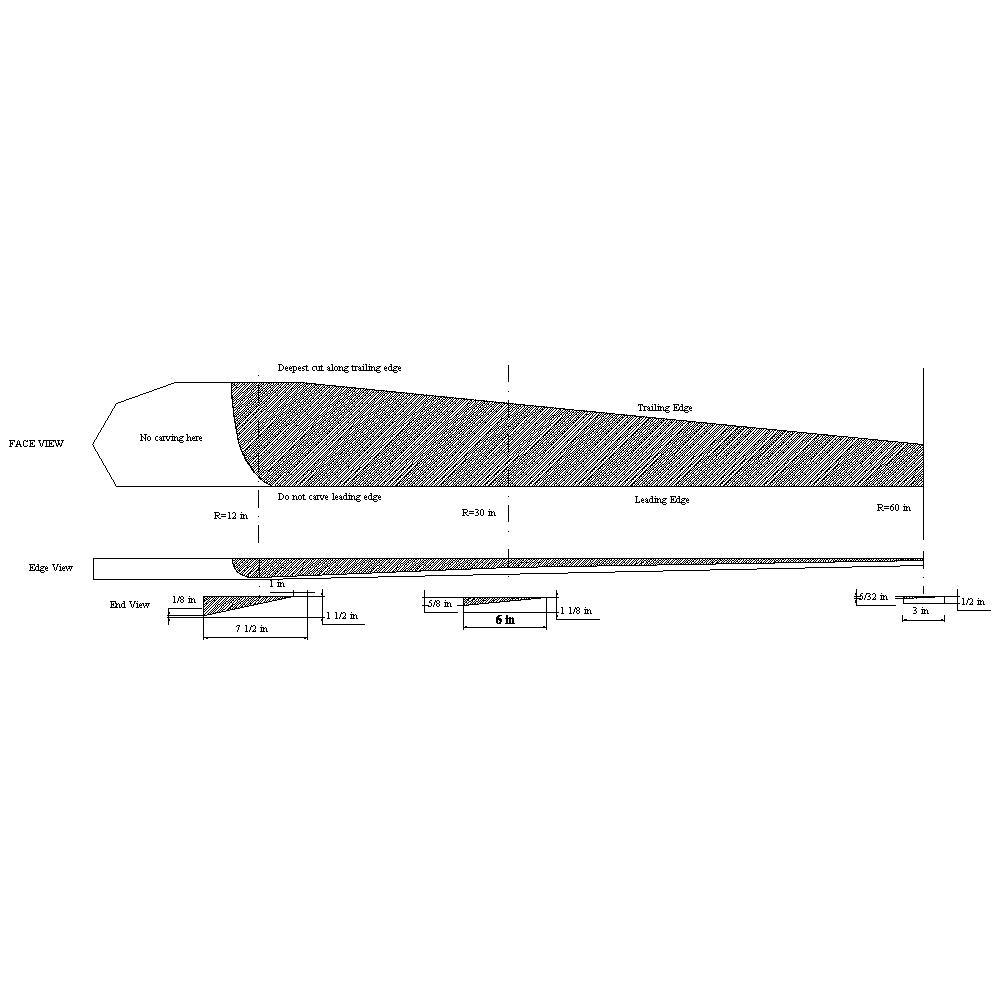
At the tip of the blade the pitch is about 3 deg. At the center (R=30 inches) it’s about 6 deg. Near the root, where we stop carving it’s as steep as our board will allow. The drawings do not discuss the angle of pitch,. Instead they show the amount of wood that must be removed from the blade along the trailing edge. The image might seem a bit confusing. In the image (center, end view) you‘re looking at the leading edge of the blade, and the darkened area is the material that must be removed from the trailing edge. Turn your unfinished blade around so you’re looking at the trailing edge, and measure down from the front of blade and make marks at R=12 inches, R=30 inches and at the tip(R=60 inches). At R=12 inches you’ll be removing all but 1/8 inch of the wood from the board. (in other words the pitch will be so steep here that it occupies almost the full board thickness, you leave 1/8” only for a bit of strength). At R=30” you need to measure down from the top of the board 5/8 inch. At the tip measure down 5/32” and make your mark there. Then connect the dots and you’ll have a line along the trailing edge of the blade to carve down to. To carve the pitch of the blade you’ll be carving between two lines. One is the one you just drew along the trailing edge, the other is the leading edge of the blade (the corner between the front of the blade and the leading edge). Do not disturb that corner of the board, but use it as a line. The ‘edge view’ images in the picture show this fairly well.

Curfing the blade with a saw and knocking out chunks with a chisel
Things get a little different as you approach the root. If you look at the image the carving stops near the root of the blade, you need to draw a line here as shown in the image past which you’ll not be carving anymore. The exact shape and location of this is not critical, but it’s nice to make all three blades the same. Best is to make a template for this and trace it onto all three blades. As the carved surface approaches this line (near the root) it will taper up to full board thickness.
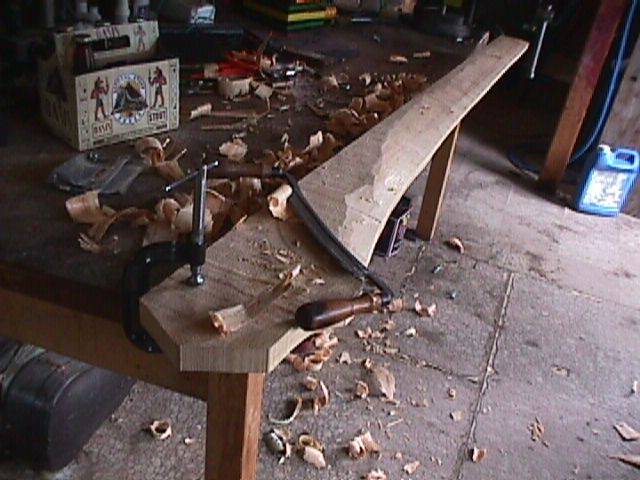
roughing out the front of the blade with a drawknife
Once you get started it should all seem fairly easy. A draw knife is a great tool for removing lots of wood fast. A hand plane, or a power planer also make pretty quick work of things. Near the root, where the carving is deep and it tapers out into the thickness of the board it’s sometimes best to cut lots of slots between the lines with a hand saw (one every inch or so) and then remove the wood between the slots with a chisel and mallet. One you‘ve carved down right to the line, smooth and flatten the surface with a plane and/or sand paper. Use a straight edge between the leading and trailing edges - the blade should be flat.
Carving the back of the blades
All that’s left to finish the job is to carve the airfoil profile on the back side of the blades. As a rule the thickest part of the airfoil is always 1/3 of the way back from the leading edge. (in other words, the blade is 3 inches wide at the tip, so the fattest part of the airfoil will be one inch back from the leading edge, at R=30 inches the blade is 6 inches wide so the fattest part of the airfoil will be 2 inches back from the leading edge). Another general rule is that the airfoil is about 1/8 as thick as it is wide. This ratio changes gradually as you approach the root so that at near the root it’s about 1/6 as thick as it is wide. This is not terribly critical so long as you’re close, but you never want to be less than 1/8 as thick as you are wide. At the tip the blade is 3 inches wide, so the thickest part of the airfoil should be about 3/8 inch thick. Anything between about 3/8 inch and 1/2 inch will be OK at the tip, it should not be more or less than that though.
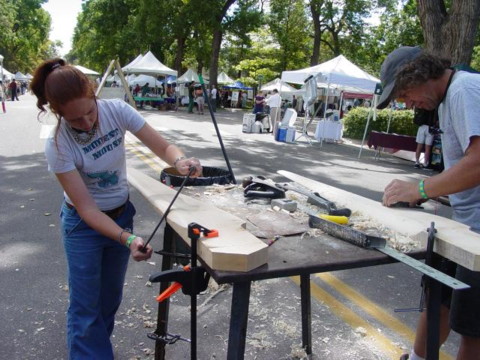
working the back of the blade with a drawknife
A drawknife is a good tool for roughing out the back side of the blade. It also moves along very quickly with a hand plane or a power planer.
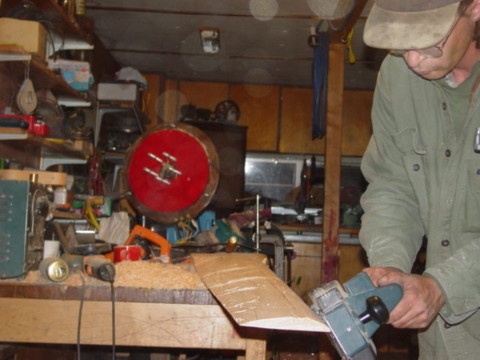
carving the airfoil with a power planer
So turn the blade over so you’re looking at the back. At R=12 inches measure back 1/3 of the way from the leading edge to the trailing edge (the blade is 7.5 inches wide at this point so measure back 2.5 inches from the leading edge) and mark it. Do the same thing at the tip (it’s 3 inches wide so measure back 1 inch). Draw a straight line between the marks. This line marks the thickest part of the airfoil and it should never be disturbed, it’s the one place on the back of the blade where you’ll do no carving. Between this line and the leading edge you need to carve a nice rounded surface as shown in the ‘end views’ in the image. Between the line and the trailing edge it could be slightly rounded but almost a flat surface. As with all other steps, it’s best to do one operation to each blade so they come out the same. I find that even a change in mood can affect your final work, so it’s good work along all three blades at the same time. Once you have this roughed out then finish it with sand paper. The leading edge of the blade should be rounded . There should be no sharp surface between the front of the blade and the back of the airfoil. As the airfoil approaches the root of the blade (around R=12 inches) is should just taper out to the original profile of the board. This area involves some concave surfaces which are impossible to do with a plane. Best is to use a draw knife or a spoke shave. The trailing edge should be brought down fairly thin (about 1/16 inch) and fairly sharp. Ideally it should be very sharp, but you don’t want to make it so thin that it’s very fragile. Now all you have left is to assemble the blades. We’ll discuss that in the next section.